Over the past few years at aequilibrium, we’ve been developing a number of digital products using MVVM. Model–view–viewmodel, or MVVM, is a popular design pattern used in developing mobile apps. In particular, when used with Reactive programming, MVVM can deliver a powerful product and experience for users.
There are a number of benefits for using MVVM, including:
- Clean and easy to read source code,
- No callback hell,
- Better error handling,
- Less crashes (errors becomes an element in the
errorObservable), - Thread management (reduce the burden of the UI thread),
- Easier unit tests,
- Similar code between iOS and Android, and of course,
- Developing is easy, fast, and fun.
Reactive programming, however, can be difficult and it’s easy to make mistakes especially as a newcomer. In this article, I will talk about an extended architecture model(RxViewModel) that we’ve been using at aequilibrium with MVVM, applicable to both iOS and Android platforms.
You can find all of the source code and examples for both Kotlin and Java in the Github repository.
Please note, it is recommended to have some basic concepts of MVVM and Reactive programming before you dive into the rest of this article.
All about action and state
Let’s start with actions and states. Actions and states play a critical role in this architecture.
An action represents user interaction. This refers to movement such as tapping a button or inputting text.
A state is the data set that the view needs to render. States are emitted from ViewModel via observables. Here, it’s important to keep state immutable — if any change occurs to the state, create a new instance.
Understand action and state, the relationship can now be understood as ViewModel taking an action as the input and emitting a state as a result of the output for the action.
Think of ViewModel as a state machine. When a ViewModel is created, an initial state is created as the currentState then given action as an input for the ViewModel to create a new state (based on the currentState).
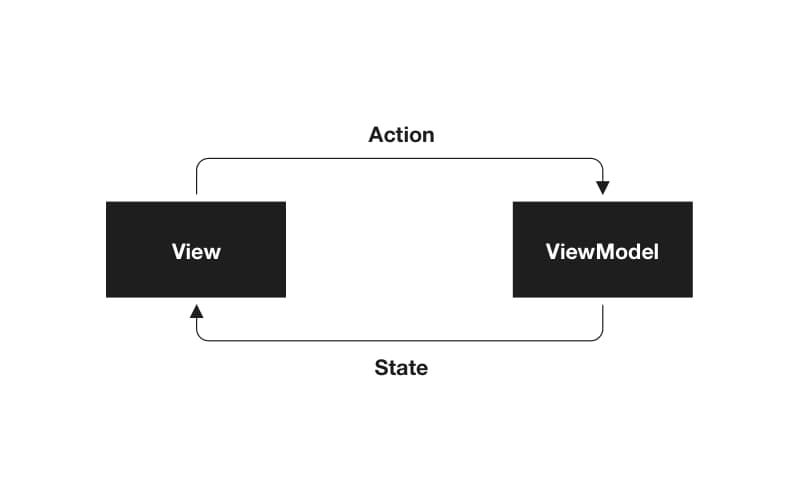
In the diagram below, View creates actions as the inputs of ViewModel and then emits the latest state as output for each action. The View will always wait for the state to change. And when it does, it will render it.

View creates actions as the inputs and then emits the latest state as output.
Example — Login Screen
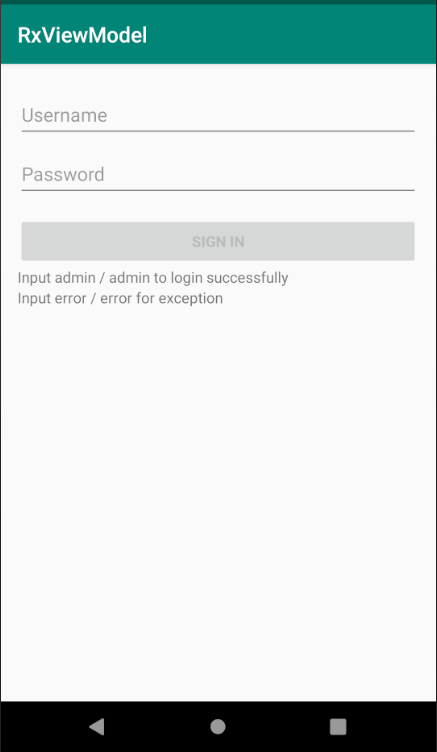
Here’s an example of a RxViewModel design on a simple Login Screen. The requirements are:
- Input username:
admin, password:adminto login successfully, - Input username:
error, password:errorto create an unexpected exception on purpose, Sign In button, enabled when the length of the username is greater than 4 and the password length is greater than 2, and- Login result (successful, wrong username/password or unexpected error)

Action
In this example, the actions are SET_USERNAME, SET_PASSWORD and LOGIN. Some actions may contain payload in the form of a string (i.e., SET_USERNAMEor SET_PASSWORD). In some cases, like for iOS, actions can be an ENUM. When coding for Android, however, we try to avoid using ENUM as it tends to impact performance. Below is an example of an action in Kotlin.

State
In this example, the state for login contains the username, password, and a read-only boolean to indicate whether the login button is enabled or not. Again, keep the state immutable.

ViewModel
RxViewModel is the base class of all ViewModels. To extend RxViewModel, subclasses need to specify the action and the state. For example:

Subclasses also need to override three methods, these methods includecreateInitialState, showSpinner , and createObservable. Here, the function createInitialState will be called when the ViewModel is created and the return value will be the initial state of the ViewModel.

Meanwhile, the function showSpinner specifies the actions that will make the view show a spinner or a progress bar. In the Login Screen example above, for instance, we have 3 actions (SetUsername, SetPassword and Login) but we only want to show the spinner for the Login action. The showSpinner will therefore only allow the specific desired action to be created.

Lastly, the function createObservable tells the superclass RxViewModel how to create the next state based on the current state. In this example, the return type is Observable of StateMapper. A StateMapper is nothing but a function that takes the current state as an input and returns the next state. With this method, the superclass RxViewModel knows exactly how to emit the next state. As you can see the code below, the SetUsername action only modifies the username in the state, the SetPassword action only modifies the password in the state, and the Login action does not modify any state.
5 observables inherited from RxViewModel
All ViewModels come with five observables from RxViewModel including:
- stateObservable, which emits the latest state after the action is executed successfully,
- actionAndStateObservable, similar to stateObservable which emits the latest state along with the associated action after the action is executed successfully,
- errorObservable, which emits an error (throwable) whenever an exception happens,
- actionAndErrorObservable, which emits an error (throwable) along with the associated action whenever an exception happens during executing the action, and
- isLoadingObservable, which keeps emitting true or false to notify Views in order to show or hide the spinner.
Based on what is needed by the View, you can create more observables from the five observables above.
Be aware that stateObservable and actionAndStateObservable emit an item only when the action is executed successfully. When an exception happens, an error will be emitted in the errorObservable and actionAndErrorObservable.
View
View only does two things: create actions and render states.
To create actions, View creates actions based on user interactions.

To render states, View renders the data coming out of observables.

Now, you’ll notice that there are two observables that we haven’t talked about yet. One of the beauties of using RxViewModel is that we can define observables according to what the View in each case needs. And those observables can be defined from the five out-of-box observables in the ViewModel (stateObservable, actionAndStateObservable, errorObservable, actionAndErrorObservable and isLoadingObservable).
isFormValidObservable in the ViewModel is defined as an observable used to tell view to enable/disable the Login Button.

Similarly, View needs an observable in order to render the login results. loginActionObservable in the ViewModel is created from actionAndStateObservable to render the results. If an error happens when executing the Login action, the actionAndStateObservable will not emit data.

Dispose of observables with RxLiveData
In the View, we convert all of the observables into RxLiveData. RxLiveData is a LiveData that includes:
- An ability to subscribe to observable when RxLiveData has an observer,
- An ability to dispose of observables so that RxLiveData has no observer,
- An ability to handle the error of the observable where the error will be emitted in the errorObservable of the ViewModel,
- The observers of LiveData, running in the UI Thread, and
- LiveData, which is lifecycle aware.
Conclusion
RxViewModel with Reactive Programming enables MVVM to be much easier to implement. The Login Screen is just a simple example of how powerful and effective it can be; with complex screens, the code is still clean, easy to read, and totally manageable. To recap why RxViewModel has been our recommended choice of design at aequilibrium, here are a few reasons how it’s benefited our practice:
- Readability. Because of using Reactive programming with RxJava / RxSwift, the style of the code is declarative.
- Code Quality. Since the code is easy to read, the code quality is naturally better. At the same time, all exceptions (except the ones from the View) become items in the errorObservable and the app becomes less likely to crash.
- Testability. Unit testing becomes super easy. Stay tuned for more! I will talk about the unit test in my next article.
- Cross-platform (iOS, Android). With the Rx family (RxJava, RxSwift…etc), the action, state, and ViewModel are pretty interchangeable between iOS and Android.
- Development Speed. The concept is simple, so once you’re familiar with it, it’s much faster to develop. View creates actions, ViewModel creates new state and emits it, then View renders the new state.
- Thread Management. Only View runs in the UI thread while the rest of the code runs in the background. You can customize the thread if you want, but the default mode helps decrease unnecessary clutter.
- Maintainability. The roles of View, Action, State and ViewModel are clear, so it’s easy to debug or add new features.
- Thin View. View only does two things: create actions and render states. There is no business logic in the View (not event the transform state to another format which is the ViewModel’s job to transform whatever data format the Views need). It’s simple.
Feel free to check out the source code in Github. It includes all of the code for RxViewModel and examples in both Kotlin and Java. In my next article, I’ll explore unit testing and app navigation with this design.


